Tag Archives: Shibori

The Secret Treasures of Pattern

I have been thinking a lot about the entity of pattern these past two weeks.
Mostly, that is because of this new piece I’m working on and my ongoing exploration of combining embroidery with an assortment of resist dye techniques, but it’s also due to a talk I listened to during the recent Surface Design Association online conference.

First Pass

I left you last time having just completed the white-on-white embroidery of this piece. Look back to that post to refresh your memory as to  where things stood at that point. It took me some time to decide how to dye this piece in the next step. Unfortunately, too many layers of material prevented the dye from seeping throughout as much as I had hoped, so the only answer was to take a second pass with a new layer of dye, creating an additional pattern. The blue grid you see here was drawn as a water-soluble guideline for the stitches that would be the basis for that design.

The Merriam-Webster dictionary defines ‘pattern’ as something that is regular and repeated within the context of design, behavior, or the way in which something happens. It also pairs the idea of pattern/design with the word decorative, a much-too superficial viewpoint, if you ask me.

Brain

Once the stitches were in place and tightly drawn up, the whole piece was dipped in dye. You have to appreciate unexpected amusements along the way …doesn’t this look like a brain?

During the SDA panel discussion mentioned above, the artist Chandra D. Cox opened the door to thinking about pattern in different and more consequential terms: as a means for expressing identity.

Ashanti - Chandra D. Cox

Chandra D. Cox, Ashanti, 2003. Acrylic on wood, 72 x 18 x 5 inches. Photo: Michael Zirkle. Reference: Surfacedesign.org     I find the pieces in this series incredibly moving. In her statement, Cox writes: “The concept behind these painted structures is meant to symbolize the end of one culture and the beginning of another…The forms are three dimensional, minimalist and ubiquitous. The silhouette recalls a “shotgun house,” a style of southern vernacular architecture with cultural roots tracing from Africa to the Caribbean and American soil…The portals placed on their sides suggest ships and allude to ‘the middle passage of human cargo’. The center is open representing a doorway. A narrow aperture recalls the arrow loops of a castle, through which, emaciated from starvation, newly enslaved Africans were forced into the belly of awaiting ships. This entryway becomes the site and repository of a history and memory, the threshold to a new beginning.”   Excerpted from First Person: “I Remember Where I Come From”, by Chandra D. Cox, Surface Design Journal Winter 2021, pg 44 & 45.

In her series “The Doors of No Return – I Remember Where I Come From” Cox employs a variety of traditional African patterns to reference and pay homage to her ancestors. She writes: “The pattern designs (I use) serve as both aesthetic adornment and an emblem for African textiles as conveyers of identities and secret messages”. She goes on to note that “This ancient cultural practice of messaging through pattern (has) withstood centuries of enslavement by adapting and transmuting the encoding”. (Think of the quilts that were used to covertly point the way on the Underground Railroad). She further acknowledges adaptations of pattern as present-day signifiers of identity and territory in urban culture.

2nd Pass

I’m much happier now that there is pattern covering the whole piece.

Considering that pattern is ubiquitous, I am fascinated by the deeper perspective of it existing beyond embellishment. I’d love to learn more about it as a marker of identity. If you are aware of any books, articles or links on the subject, please let me know. Examples that most readily come to mind include Scottish tartans and the knitted patterns worn by the fisherman of the Aran Islands, but there must be innumerable other instances.

Emma WIP

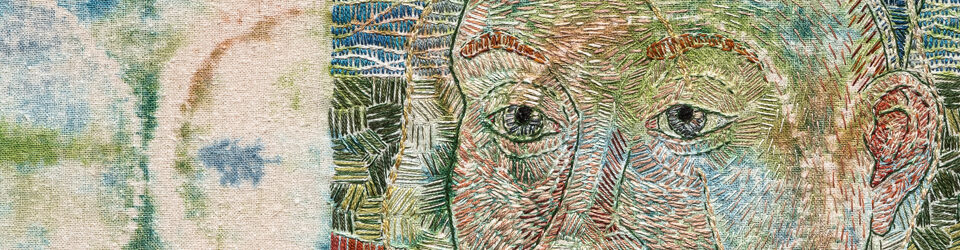
Bringing the image to life. These very first steps are a chance to begin to play with color in tandem with the patterns of the background dye and the original embroidery.

Meanwhile, the Shibori patterns I use in my work are all adaptations and appropriations of the discoveries and artistry of Japanese masters. In that light, I’m interested to learn more about the patterns of my English ancestry, perhaps discovering a well to draw from in the future. What is there to uncover about the identities Anglo-Saxon designs portray beyond, say, the wealth (or lack thereof) expressed through the materials used to create them? Such an interesting subject.

Testing, 1-2-3

The thing about Shibori is it can be both mentally invigorating and relaxing, often at the same time. I’ve been looking forward to this week’s work, knowing I’d have the stimulation of a puzzle paired with the soothing calm of stitching row upon repetitive row of running stitches.

Sketchbook Notes

Quick notations capture possibilities and remind me of fleeting ideas

In teasing out an approach for the dyed background of my “letters from home”, I’ve thought of plenty of possibilities. The overall goal is to find an idea that is generally repeatable, yet with enough elbow room for variations that will allow each piece to hold its own among the others in the series.

Ori-Nui

I keep even the smallest amounts of dye on hand so that I can make mini-samples on the fly. For the process of Ori-nui, the cloth is folded and stitches are made parallel and close to the fold. It’s a good way to achieve definition. I felt the stitches I’d made in this sample were too far from the fold, so I adjusted that distance in my final, full-scale sample.

I also have to keep in mind how the embroidery-to-be will fit, so that it doesn’t become lost against the color and pattern of its dyed background.

Mid-stream stitching

Once I get to the stage of sewing the resist stitching, I can settle in and relax. Where to stitch, what direction those stitches will take, and where the knots will be placed have all been decided. So there’s nothing to do at this point but listen to a book or podcast and get to work.

It’s all well and good to jot down options in a sketchbook, but it isn’t until the needle actually pierces the cloth that reality sets in and decisions/questions begin to crop up in earnest. Should the striations of pattern all go in the same direction – or perhaps oppose each other? How best to keep a crisp line between areas of pattern and open spaces of dye? Can I balance those two while keeping in mind that the third crucial element of the embroidered imagery will be added later?

Ready for Dy

With the stitching complete, the fabric is ready to soak and then all the threads will have to be drawn up tightly and knotted before beginning the dye process.

An example of the many things to think about: an often overlooked characteristic of Mokume stitching is that even the point where one chooses to begin a row of stitching can impact the final appearance. I am quite fond of the little white dots left un-dyed by the knots at the end of my stitching thread, so I try to work out ways to incorporate them that will enhance the piece without distraction. It’s worth noting that beyond contributing added visual “zip” for those who look closely, those tiny spots are also a reminder that this process is very much hand-made.

Knots

Admittedly they are very subtle, but I think the marks left by the knots at the end of my thread elevate the pattern as a whole, so I try not to hide them if possible.

Last but not least, at this early stage everything must be worked within a pre-determined finished size to accommodate framing.
So yes, lots to think about and I have my work cut out for me. But I wouldn’t have it any other way.

Finished Full

And there you have it – the finished, dyed piece. The dye came out a bit like the Northern Lights, don’t you think?

Finished Dye- Cropped

If I go with a 12 x 12 inch final dimension as originally planned, this is about where it’ll end up.

Most of our fall yard chores are now complete, crowned, as always, by the all-important planting and securing of the garlic under its snug winter cover of leaves and burlap.
Time to get ready for garden dreaming in hibernation season by turning to books. After reading the article I mentioned in my last post, I picked up David Culp’s The Layered Garden from the library for his ideas on how to bridge the seasons in your garden.  My favorite example of this idea is Jack Lenor Larsen’s Red Garden at the Longhouse Reserve.

I have a beautiful red twig dogwood and tend to leave areas of echinacea and bee balm for visual interest against the snow (and any late foraging birds). But I wonder what other ideas Culp might have. I was rewarded this morning, waking up to a frosted landscape that reminded me just how lovely every season can be.

Frost


Small Plates

To me, the half the fun of tapas – or a pre-Covid cocktail party with lots of different appetizers – is the variety of small plates one can sample. Most weeks, my time in the studio mirrors that approach – a little bit of this and a little bit of that filling up the hours. In that spirit, here are a few so-called “tastes” of what’s been swimming in my head these past couple of weeks.

First, my big news is that the Fall Issue of the Surface Design Journal is now out. Every autumn SDA publishes an International Exhibition in Print. This year’s show, “From Confrontation to Catharsis,” feels both relatable and personal. The diverse scope of work exhibited addresses many of the overwhelming challenges of 2020. As I read each artist’s statement, the word that often comes to mind is “fragile”. So much of the work is a commentary on fragility: of our systems, our planet, our connections, our history, and even our human-ness.

SDA Journal Page

However, in viewing the show, one can’t help but also be reminded that there is empowerment and strength in expression, and as such there is an underlying sense of hope that resides with these works.
I am gratified and honored that “Until the Bitterness Passes”, one of my shibori houses from last year, was selected to be included.

It’s Inktober!
While I haven’t followed every prompt set out this year, I have enjoyed interpreting of a handful of them. Here are just a few.

Crystal

Crystal    ©2021 Elizabeth Fram, Ink and graphite on paper, 5.5 x 5.5 inches

Another perk of the project is it’s great for filling up those last few straggling pages in one’s sketchbooks.

Suit

Suit    ©2021 Elizabeth Fram, Ink, watercolor and graphite on paper, 5.5 x 5.5 inches

I have 4 different colors of ink on hand and Inktober has been an opportunity to experiment with them — supplementing with a tiny bit of watercolor when a different color is needed.

Stuck

Stuck    ©2021 Elizabeth Fram, Ink and graphite on paper, 5 x 8 inches

It also gave me an excuse to go ahead and purchase my new favorite under-$10 art supply (does one really need an excuse to buy art supplies?): a porcelain petal palette. It’s a great tool for mixing numerous values of ink all at once.

Porcelain Petal Palette

Oh, and speaking of cheap supplies, check out my new water jug! It’s a creamer that I found and snapped up this summer for just this purpose – also less than $10. The spout is brilliant for wiping the extra water off one’s brush before dipping it back into the ink. Now I wish that I’d also gotten the creamer from the black set since I usually have two water containers going at once, one for dirty and one for (relatively) clean water.

Mussel Shell detail

detail ©2021 Elizabeth Fram, Stitched-resist dye and embroidery on silk.       I still have to come up with a title for this.

Meanwhile, I’ve been puzzling my way through the shibori/embroidered “letter from home” I showed you last time. Surprisingly, the mussel shell was a snap to realize, but figuring out what to do with the envelope has been an unexpected challenge (lots of stitches sewn and then picked out). Next post I’ll write more about my discoveries and process along the way, but in the meantime I have some experimenting to do in order to figure out how to approach the dyed pattern in relation to the central shape – as well as what overall finished size/shape to use.

Mussel Shell

©2021 Elizabeth Fram,  Stitched-resist dye and embroidery on silk, approx. 12 x 16 inches   I think I’m going frame this one like this. Allowing the area without pattern to show provides a much needed sense of balance to the piece as a whole.

Framing will be part of that consideration. Unlike in this piece, which I dove into without finished dimensions in mind, I need to plan ahead so I don’t back myself into a corner.

I get a lot out of James Cleary’s 3-2-1 Newsletter; it’s a short and sweet shot in the arm each Thursday. The list below was particularly resonate. Maybe for you too?

How to Build a Career in 7 Steps:
1. Do great work
2. Share it publicly
3. Cold email people 2 steps ahead of you
4. Talk about your work and trade ideas
5. Host events and meet in-person
6. Become friends
7. Rise together

I get just as much of a lift from the beauty of my garden in fall as I do in spring and summer. While the colors are a bit more nuanced, they’re just as striking. Did you happen to read the NYTimes article “Take a Walk in the Garden Before It’s Too Late“?

With that in mind, my Instagram recommendation this time is @pottersarms, whose images of flowers, often in various states of decay, are quite lovely and somehow momentous.

©Sandy @pottersarms

© Sandy @pottersarms

And finally, to bring you full circle, the next time you’re in Asheville, NC consider a meal at Cúrate – a tapas bar that will satisfy any yen for delicious variety.

Detours

Part 1 – Firestorm

There’s often no telling how an idea will evolve.
A piece may start with a specific destination in mind, but logistical snags invariably crop up and I soon find myself on a different path. The serendipitous twists and turns that result take me to a place I hadn’t imagined, but one where I am ultimately quite happy to have landed.
What follows is the story of one example of this phenomenon unfolding.

Preliminary Sketch

As the top sketch shows, capturing an idea often takes just a few quick lines. But the evolution of that idea invariably becomes much more complicated as one moves through the process. My initial idea was to make a house that was completely enclosed / cut-off from everything around it.

News of the devastating wildfires out west, paired with having a son who has been navigating dreadful air quality at home in the Bay area, has gotten me to thinking what a malleable canvas these little houses can be for making a statement beyond COVID-19.

Reporting on personal wildfire stories has stressed the horror of being surrounded by fire as it rages all around. While I can’t begin to imagine such a scenario, I wanted to make a piece that in some way expressed that sense of being enclosed or trapped.

Resist stitching

Resist stitches in place before the dye bath

My original plan was to make a small house that would sit in the center of a larger, house-shaped shell, and to use a translucent fabric for the outer house. Silk organza would allow one to see the house within, while also being a worthy medium for portraying the amorphous nature of fire which I planned to suggest with dye. Unfortunately, organza’s porosity, a characteristic I expected to work to my advantage, was also a downside. When undoing the resist stitches I’d sewn before the dye bath, I discovered that the dye had seeped right through many of them, leaving only a faint pattern. That fact, paired with relatively weak color, resulted in a rather anemic appearance.

1st Dye

This suggests fire, but not as forcefully as I’d imagined

However, there are always ways to work around an issue.
While dyeing the unstitched areas of the fabric, I discovered a way to create an effect reminiscent of the striations of flickering flames (as seen in the top section of the silk in the photo above). So I dyed more organza, employing that process with stronger color, figuring that layering the two lengths of fabric, one on top of the other, would achieve the effect I was looking for. It worked rather well.

Layered Fabrics

With the fabrics layered together, the color and effect is much closer to what I envisioned.

Not wanting to compete with the impact of the fire-inspired cloth, I decided to leave the inner house a blank slate, covering it with un-dyed raw silk and stitching with neutral-colored thread. Spent daylily flower stalks gathered from my garden, varnished and sewn to the house, enhance the effect of the natural coloring while providing support.

Undyed House

The house constructed with the daylily stalks as stilts.

Once this stage was complete, I ran headlong into the problem of how to then create and support the organza casing that would surround it. I have a full page in my sketchbook with various brainstorming solutions, none of which ended up being right or feasible to execute. It became apparent that I was going to have to switch gears.

The “fire” would have to run up the sides of the structure rather than fully enveloping it. I was still undecided as to whether or not to support it so that it would hover above the roof and be held out from the sides as in my original plan, or lay it directly upon the roof, letting it fall naturally down the sides. If it hovered, the stalks’ prongs could be leveraged to support the fabric, but even if not, their physical resemblance to a flame still added significantly to the overall impact.

In the midst of deciding how to attach the fabric, I discovered that using both layers of dyed organza together (discussed above) was unworkable; the layers became just too thick and unwieldy. However, reverting to using the originally dyed piece alone worked beautifully. Layered upon itself as it was gathered and folded to fit the narrow roof space, the previously bemoaned lack of pattern and color suddenly came alive.  Pressing folds into the silk to create a tactile pattern that is reminiscent of flames added to the overall effect.

Fire Up the Sides

Loosely pinning the fabric in place, one begins to get the impression of fire, the effect of which is emphasized by pleating and the jaggedly raw edges along the roofline.

Running my progress by the discerning eye of a trusted artist friend, she rightly commented that the house, left white, appeared “unscathed and disconnected” from a fire’s devastation. My decision to keep the house neutral was meant to suggest universality, but she was of course right — the piece appeared inappropriately light – even upbeat. The solution was charcoal.

Charred

Drawing with charcoal directly upon the raw silk, achieves the charred effect that is necessary for conveying fire’s impact.

In the end, I decided to leave the dyed organza resting directly on the roof rather than elevating it. The top edges of fabric have been left raw and uneven which not only suggests the upward movement of flame as it consumes a building but, with the bottom edges of the organza sweeping around the base of the piece, I could maintain the suggestion of the house being enveloped.

Firestorm Frong

Firestorm   ©2020 Elizabeth Fram, Stitched-resist dye, charcoal on silk with foraged daylily stalks, 17H x 12W x 10D inches

I’ve learned not to be surprised by the unexpected issues that present themselves as most of my pieces come to life, or the need to puzzle my way to a solution. It is the rare work, for me anyway, that runs a straight line from conception to completion. But to be honest, that is one of the perks of art-making — it’s what keeps each day fresh, interesting, and ultimately rewarding.

Firestorm sideview

Firestorm   ©2020 Elizabeth Fram

Part 2 – Isolation

The addendum to my blow-by-blow tale above is that going down a different path doesn’t preclude one from getting back to the original starting point. After finishing Firestorm, I was still anxious to find a way to make a piece that mimicked my original sketch. I thought of all sorts of options for how I might construct a wire structure to support an organza “envelope”, but in the end they were all a bust. Any wire I tried was too soft and flexible to hold its shape. What could I use that would maintain the stiff, straight lines I wanted?

Framework

It took my architect father less than a moment to offer a solution: coat hangers. We talked through the best way to form the frame and how to attach the various pieces to each other. In no time I had the structure I’d envisioned and after that everything came together very quickly.

Suspended

Hard to believe because my thread drawer is brimming, but I had to dye some silk thread to get just the right color for this one. However, it was too dark to use to suspend the little house. But no worries, I had just what I needed in that notorious stash.

After making the inner house, I suspended it with clear thread so that it would appear to be floating. The next step was to make a house-shaped sleeve out of silk organza to tightly fit over the wire frame. I didn’t mind the idea of seeing seam allowances, in fact, that seemed preferable to me aesthetically.  Joining the seams via the hand-stitching method used in Pojagi (Korean Quilting) was the best way to complete this step.

Pojagi

This is one of the more delicate ways to join two pieces of fabric; its effect is lovely

Now complete, the outer casing was stitched invisibly to the frame to keep it taught. The final piece appears exactly the way I had hoped. Whether describing the fraught emotions of being caught in a fire or isolated by the coronavirus, it strikes the note of removal and disconnect that I had originally intended.

Isolation

Isolation   ©2020 Elizabeth Fram, Stitched-resist dye on silk and silk organza on wire framework, 9 x 7 x 7 inches

Time and again, I’ve found that hitting stumbling blocks and being forced to rethink my approach allows for an idea to evolve into something greater than I might have come up with in one shot. The roundabout discoveries often provide a suitable proving ground for finding my way back to an idea that needed additional “simmering” before it could be realized. It makes the detours well-worth the time, and perhaps ultimately a sort of secret weapon.

Thanks so much for hanging in with me to the end of this very long post!
Ready for a visual palate cleanser? Check this out.


Enjoying the Ride

Last  July I started experimenting with a new approach to my dyed and stitched pieces.
Flipping the coin from the way I’d been working, I started embroidering the imagery with white silk thread first, and then dyed the cloth afterward using a new stitched-resist method that I had begun experimenting with at the Vermont Studio Center in April.

Espresso and Peanut Butter 1

Espresso and Peanut Butter  ©2018 Elizabeth Fram,  In process, Stage 1

My hope was that the silk thread would absorb the color and pattern of the dye process, leaving the image to some degree camouflaged while still maintaining its visual strength. I wanted the viewer to be drawn in by the pattern and to discover the imagery upon closer inspection.  Unfortunately, the results were decidedly unsatisfactory because the image became almost completely lost. It shows more clearly below because the angle of the photo catches the light to its advantage.
To jog your memory, check back to my post “Committing to a Process of Search” to read about my initial stab at this new process.

Espresso and Peanut Butter 2

Espresso and Peanut Butter     ©2018 Elizabeth Fram,  In process, Stage 2

After working my way through the more recent lobster piece (my second attempt at this idea), I returned to the original this week with new thoughts on ways to salvage it from its ghost-like appearance.

Espresso and Peanut Butter 3

Espresso and Peanut Butter     ©2018 Elizabeth Fram,  In process, Stage 3

While there are elements of the process I’d like to tweak, I am definitely making progress toward my initial objective. And more importantly, as I work back and forth between the stitches and the pattern they sit upon, I’m really enjoying the ride.  For lack of a better way of describing it, there’s a satisfying rhythm to considering both image and surface, puzzling out a way to bounce between the two so that they can simultaneously work together and independently, with neither being overwhelmed by the other.

Espresso and Peanut Butter 4

Espresso and Peanut Butter     ©2018 Elizabeth Fram,  In process, Stage 4

Meanwhile, serendipity happened in the form of Neil Gaiman’s 2012 University of the Arts commencement address “Make Good Art”.
The thing about a good graduation speech is that it’s just as inspiring to everyone else in the audience as it is to the graduates…maybe even more so because being older provides the benefit of life experience as a measuring stick. Gaiman’s advice resonates loudly and clearly in its encouragement to make mistakes and to keep trying.

Espresso and Peanut Butter Detail

Espresso and Peanut Butter, detail     ©2018 Elizabeth Fram, Stitched-resist and Embroidery on Silk

If you too are attempting to gain some traction in your current work, give it a listen and see if it doesn’t give you a boost.

Espresso and Peanut Butter, full

Espresso and Peanut Butter     ©2018 Elizabeth Fram, 20 x 16 inches unframed, Stitched-resist and Embroidery on Silk

Not There Yet

“I have not failed. I’ve just found 10,000 ways that won’t work.”  ~Thomas Edison

I wish I could say, after all the folding, stitching, and dyeing of the lobster piece this past week, that I was completely blown away by the success of my results once all the resist stitches were painstakingly picked out. But sadly, that isn’t the way it turned out.

Lobster Full

Come out, come out, wherever you are

While I’m very happy with the shibori pattern that developed, and I’m grateful for figuring out how to seat the image within that pattern, it’s a huge disappointment that the embroidered lobster image has become completely lost and is now practically invisible. It’s a ghost lobster, if you will. Somehow I have to puzzle out how to illustrate the idea of ‘hidden in plain sight’, but it will have to include the one thing that is sorely missing, the root of my misstep: contrast.
I’m headed back to the drawing board.

Lobster Detail Ghost

Ghost Lobster

In the very beginning of my shibori journey, I came up against a similar brick wall. Some of you may have heard me tell about the first piece from my Dog Walk series – where I used stitched-resist to define the silhouette shadow. I undid those resist stitches with the same level of anticipation, only to be sorely deflated at the unremarkable results.

Shadow Walk

Shadow Walk     ©2012 Elizabeth Fram, 36 x 42 inches, Stitched-resist dye, paint, and embroidery on silk

But after letting the piece simmer for a bit, I hit on the idea to break up the space with a grid of color by layering textile paint on top of the shibori image. This was followed by defining both the grid and the image with stitch. It not only solved my immediate problem, but also started me down this path I’ve been happily following for the past several years: combining shibori patterns with embroidered images.

Shadow Walk detail

Shadow Walk, detail     ©2012 Elizabeth Fram

So, I haven’t lost heart; I’ll figure something out. Challenges are a good thing – and in the meantime the process will give me something to write about in the weeks to come.

The most interesting thing I learned about this week was the work of Maria Sibylla Merian (1647-1717). Entomologist, botanical artist, and naturalist, she was the first person to record metamorphosis, documenting and illustrating the life cycles of 186 insect species throughout her life. Her classification of butterflies and moths is apparently still in use today.
Check out the link above to get an idea of the height of her mastery.

Merian copper engraving

Illuminated Copper-engraving from Metamorphosis insectorum Surinamensium, Plate VI. 1705 by Maria Sibylla Merian

She created volumes of spectacular botanical illustrations. They were painted in watercolor because, as a woman, the guilds of her time wouldn’t allow her to use oil paints. In 1699, at the age of 52, she traveled to the Dutch colony of Surinam so she could sketch the animals, plants, and insects there. Her journey was remarkable for the fact that she was able to undertake it in the first place, and all the more so because it was sponsored by the city of Amsterdam.

Metamorphosis, Merian

Plate 1 from Metamorphosis in Surinam by Maria Sibylla Merian

Everything else aside, with the heat we’ve experienced this week, can you imagine traveling to and working in the tropics dressed in the many long layers of dress worn by women in 17th century?
And on another note, I wonder if Merian’s work was inspiration for Mary Delany?  It must have been.

Leap of Faith

Do you remember this piece from several weeks ago? I am taking what I learned from it and trying again with the goal of figuring out how to portray something “hidden in plain sight” — a stitched image that is camouflaged within shibori patterning while remaining visible.

Pattern draft

Another challenge is deciding what the shibori pattern will be so that it works together with the shape of the image, not against it.

This time I’m using my lobster drawing from a couple of weeks ago as a jumping-off point. I sewed the stitches as densely as I could, trusting their solidity would make it possible for the image to hold its own in relation to the visual strength of the dyed pattern that is yet to come.

Stitched lobster

The rectangular stitched area is 6 x 9 inches. The background stitches were added to set the image apart from the rest of the cloth, hopefully helping the lobster to stand out once the shibori pattern is in place.

In reading Young Yang Chung’s Painting with a Needle, I’ve learned that Asian embroiderers commonly placed various kinds of padding underneath areas to be embroidered in order to achieve a three-dimensional effect. Perhaps creating a relief-like form will give this lobster the oomph it needs to mingle and co-exist with the dyed pattern, each with its own voice, but neither overpowering the other.

Padding

I used both batting and heavy silk thread to pad the lobster, some areas more heavily than others. I think it adds something of a sculptural effect. The process is very reminiscent of trapunto.

The middle image in this post shows the completed embroidery. The next step will be a huge leap of faith as I move forward with the dye process. I hope what I have to show you next week will be a happy outcome, or at least a step in the right direction. For now I am cautiously optimistic.

Stephen King’s On Writing: A Memoir of the Craft and Anne Lamott’s Bird by Bird: Some Instructions on Writing and Life both hold a place on my “favorites shelf”. I return to them from time to time for inspiration, encouragement, and solace. Writers may write about writing, but for the most part the wisdom they share can be directly translated to any form of creative work. It’s just that they’re, well, writers, so they have a knack for making the information both inspirational and accessible.

I will be pushing the above two books closer together to make room for Ann Patchett’s The Getaway Car: A Practical Memoir About Writing and Life, which I read this past week. It has earned its spot next to the others. At 45 pages, it’s short, to the point, and so very worth your time if you’re interested in such things.

Partners

The series of shibori-dyed and embroidered pieces I’ve been making for the past year are all tightly connected. Ideas that crop up in the midst of working on one usually find their way to actualization in the next. As such, all the works are related and in many ways companions. Yet these two peonies, the first pieces I’ve completed in 2018, are more tightly paired than all the rest.

Crescendo

Crescendo      ©2018 Elizabeth Fram, 14 x 11 in., Stitched-resist dye and embroidery on silk.                                                                                                   This piece is now framed and has been sold to a  collector who has very generously agreed to delay shipment until after my upcoming show is finished. Follow the progression of its creation

As interpretations of a couple of sketches made two days apart last July, (note the progression of the blossom opening), they will be viewed side-by-side in my upcoming exhibit Drawing Threads: Conversations Between Line & StitchVariations in tone and scale are slight enough to leave no question that they were conceived together, yet subtle differences allow each to carry its own voice.

Pesante

Pesante      ©2018 Elizabeth Fram, 14 x 11 in., Stitched-resist dye and embroidery on silk.                                                                                                         Finding the right title is often challenging. I wanted to find names that would match the feeling of these pieces. The full opening of a peony is glorious, and the word Crescendo perfectly matched the anticipation and build-up to a peony at its peak. Pesante, also a musical term, means “in a heavy manner”. It seems to fit the nature of the flowerhead in this image perfectly.

I dyed the silk for both of them at the same time, but with attention to maintaining some differentiation. Crescendo’s background is deeper and more saturated, begging for the strength and pop of the bold magenta threads. Powerful color allows the stitching to maintain authority amid the surrounding intensity of dye, while also providing a means of grounding the more open and fluttery petals.

Crescendo, detail

Crescendo, detail     ©2018 Elizabeth Fram

The flowerhead of Pesante, heavier and more compact than that of Crescendo, works in tandem with its more muted background dye tones and the dustier colors of thread used to describe it. Its visual weight allows Pesante to hold its own against its showier sister.

Pesante, Detail

Pesante, detail     ©2018 Elizabeth Fram

Both images explore the same vase and table surface, yet it became apparent that each had to be approached differently…another fruitful learning experience.

These pieces are not a diptych, although they will be displayed together for the duration of the exhibit. They are independent of each other but they are still partners, which reminds me of a line from Kahlil Gibran’s poem On Marriage

“Sing and dance together and be joyous, but let each one of you be alone,
Even as the strings of a lute are alone though they quiver with the same music.”

On a different note:_________________________________________________________________________________________

It will come as no surprise to anyone who knows me that this book by David Remfry looks absolutely charming.  Parka Blogs has more info.

Try, Try Again

For the past month I’ve been working on the three small pieces I dyed in September.

Mug

Sidekick     ©2017 Elizabeth Fram

It was relatively smooth-going on the first two, but the third has proven to be a real challenge. I mistakenly thought that working smaller would be quicker and easier (the image area of each is around 3.5″ x 4″). Yet it didn’t exactly work out that way. This has been one of those instances when I have been grateful for the ease with which stitches can be undone.

Scissors

Yin Yang     ©2017 Elizabeth Fram

Of the dozen pieces in this on-going series, this latest one has definitely been the trickiest, with many false starts. The saucer was killing me until I finally decided to just dive in and keep stitching to see what would happen.

Stage 1

In Process     ©2017 Elizabeth Fram

Although there are technical elements of the earlier iterations that I like a lot and will likely pursue in the future, that darn spoon needed to be grounded.

Stage 2

In Process     ©2017 Elizabeth Fram

The experience is best equated to matching up the threads of a screw-on lid — while sometimes the top seems to be closed, you know it’s not quite right.

Saucer & Spoon

Prone to Wait     ©2017 Elizabeth Fram

There’s nothing to be done but undo and retry, sometimes several times. Keeping in mind Adrianna Huffington’s quote: “Failure is not the opposite of success, it’s part of success”, it’s a sweet feeling once everything is settled properly into the grooves at last.

Saucer & Spoon Detial

Prone to Wait, detail     ©2017 Elizabeth Fram

On a Different Note________________________________________________________________________________________

Decoding the Creative Genius of Leonardo da Vinci: This week Tom Ashbrook of NPR’s On Point interviewed  biographer Walter Isaacson about his latest book ‘Leonardo Da VInci’. Fascinating! I’m adding it to my “to-be-read” list.

Shibori x3

Working in tandem with my 3 jalapeño sketches last week, I stitched my way through the waiting period between watercolor washes.

stitched-resist

Stitched-resist

When I was a college student, I spent a Winter Term in Seattle working with and learning from watercolorist Karen Guzak. At that time her studio was in her home and she counseled the value of such an arrangement in allowing one to multi-task — a term I’m not sure we were using yet in the late 70’s. At 20, I couldn’t relate to being able to throw in a load of laundry while a different kind of wash dried, but her words stayed with me and have served me well. Always having a home studio is what has allowed me to work continuously around the privilege of being home with two kids.

shibori 2

Stitching drawn up and dyed

Just as I mentioned last week, there is much to be learned through repetition and variation, and that fact is perhaps most salient when pieces are made in close succession.

shibori 3

I usually set up at least 3 different colors of dye to use at once. These pieces gently progressed through variations of those colors so that they are each in the same family while remaining different. Thread choice will eventually highlight those distinctions.

On a Different Note________________________________________________________________________________________

What I’m reading now: A Piece of the World by Christina Baker Kline — “a fictional memoir of the woman in the famed Wyeth painting Christina’s World” – Erik Larson.
So far, so good – there is much that resonates considering its Maine setting.